When I first started quilting I wanted very much to do a half-square triangle block quilt. I also had some linen fabric that I wanted to use, so I began making half-square triangle blocks with it. I used a solid sage green and a floral print with sage green, yellow, and natural linen. Both fabrics were taken from recycled linen clothing I found at my local thrift store.
Anyone who's worked with half-square triangle blocks and/or linen is probably shaking their heads right now. Half-square triangles can be tricky for a novice, and linen...well, linen tends to stretch out of shape when you work with it. Especially if you're making half-square triangles out of it without any regard to the fabric's bias.
I knew the linen seemed to warp easily as I made my half-square triangle blocks, but I decided to forge ahead and see what I could make out of it. Pinwheel blocks!, I thought in blissful ignorance. Because if half-square triangle blocks made of linen seem a get a little out of shape a little too easily, you should realize that linen pinwheel blocks are downright finicky.
But I kept at it, making those half-square triangle blocks and then the pinwheel blocks. Then I realized that not all of my pinwheel blocks were turning in the same direction. I had assembled half of them turning clockwise and the other half turning counter clockwise. I really didn't want to rip the seams out to remake all the blocks turning in the same direction, but I didn't have enough solid sage green material left over to make additional blocks.
That's when I set the whole project aside for half a year. Then last fall I realized that I could make some blocks using the floral print linen with some oatmeal-colored linen that I had on hand. I made up the half-square triangle blocks, but never got around to assembling them into pinwheel blocks before the holidays.
Fast forward to late winter. I decided it was time to get this quilt finished. I laid out the blocks that I had assembled and then realized that I didn't really have enough of the floral print/oatmeal half-triangle squares completed to make enough pinwheel blocks. I threw my hands up in the air and set the project aside once more.
Finally, the week after Mother's Day, I forced myself to re-evaluate this project and find some way to complete it. This time the stars came into alignment and I quickly found an arrangement of blocks that 1) I liked, and 2) didn't require any addition block assembly. I set the clockwise-turning pinwheels on the left and the counter-clockwise turning pinwheels on the right. In the center I alternated the oatmeal and floral print half-square triangles in a flying goose pyramid and a divided triangle pattern. I used solid oatmeal-colored linen on the sides to make the throw-sized quilt a decent size and then assembled my quilt top. I used an old flannel sheet for batting, and for the backing, I decided to use a spectacular vintage 1970s cotton-poly blend sheet.
Finally, the week after Mother's Day, I forced myself to re-evaluate this project and find some way to complete it. This time the stars came into alignment and I quickly found an arrangement of blocks that 1) I liked, and 2) didn't require any addition block assembly. I set the clockwise-turning pinwheels on the left and the counter-clockwise turning pinwheels on the right. In the center I alternated the oatmeal and floral print half-square triangles in a flying goose pyramid and a divided triangle pattern. I used solid oatmeal-colored linen on the sides to make the throw-sized quilt a decent size and then assembled my quilt top. I used an old flannel sheet for batting, and for the backing, I decided to use a spectacular vintage 1970s cotton-poly blend sheet.
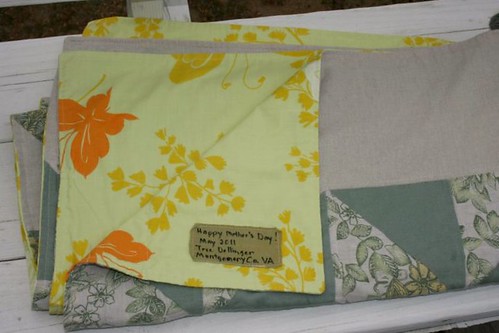
There's a story behind this sheet. My grandmother, my mom's mom, loved the color yellow. And she adored butterflies and plants. When I found this particular bedsheet with yellow and orange butterflies and ferns, I immediately thought of Memaw. It was a perfect backing for a Mother's Day quilt for my mom (even at that point it was well past Mother's Day and I hadn't even finished assembling it yet) and the colors were a nice counterpoint to the sage greens on the front of the quilt.
So there I was, congratulating myself on wrapping up an unfinished project when it occurred to me that I had not even considered how I was going to bind this quilt. We were leaving to visit my parents the day after the next and there really wasn't enough time to make a binding, quilt the quilt, and attach the binding before we were going to leave. That's when I decided to cheat a little. I layered the quilt so that I could stitch all around except for about a 5 inch gap, then flip it inside out and close the seam with a ladder stitch. Voila! A self-seamed quilt. I ran a top stitch all around the inside edge of the quilt, then stitched in the ditch around each half-square triangle block. Not the most sophisticated quilting, but it finished the quilt nicely in the amount of time I had left. I popped the quilt in the washer and then dried it while I rushed around packing for our upcoming trip.
See that butterfly applique on the top of the quilt? When I took the quilt out of the dryer I saw that the seams had separated in one place on the quilt top. One half-square triangle block had really stretched beyond my seam allowance. No matter at this point in the game! I cut out a butterfly from a remnant of the backing fabric and appliqued it to the front to cover the popped seam. I use Steam-A-Seam for my appliques, which adheres really well. I also ran a machine stitch around the outside of the applique for good measure. The sheet fabric will fray up some with time, but it still suits this particular quilt.
I made a label for the quilt and then I was done! One less UFO (UnFinished Object) in my work-in-progress pile!
I'm not really happy with the way my labels look, but I still would like to write them by hand. I'd like something a little neater, but my indelible pens seem to skip and drag on the fabric when I write on it. I think I'm going to try putting the fabric on a piece of sandpaper before writing my next label. Hopefully that will hold the fabric in place and allow me to write more smoothly.
And of course my mom loved the quilt when I gave it to her, even with its quirky flaws. One of the first things she said was, "I think your grandmother had those sheets."
Sometimes it's the quilt that you mess up that teaches you the most.
Sometimes it's the quilt that you mess up that teaches you the most.

